I was placing my laptop down on the desk and it slipped out of my hand and the back left corner hit the desk kind of hard. I didn't think anything of it as it only fell about two or three inches from my hand to the desk. I then started to type away and neither of my shift keys worked. All others appeared to work, the caps lock worked, I could bring up the virtual keyboard and the virtual shift worked, but not the physical ones.
So this really isn't a true keyboard replacement, rather a keyboard re-seating. But the same principals apply. I expected to find that the ribbon cable from the keyboard to the system board to have been jarred loose. But as it turns out this keyboard has solid contacts that slide into a slot just under the track pad. Curious that only the shift keys were affected?
Remove the power cord and battery. Make sure you are properly grounded to avoid static discharge while working. Any time you work with the plastics on laptops there is always the chance for damage. Perform this operation at your own risk. I am not responsible for equipment and or personal injury.
 |
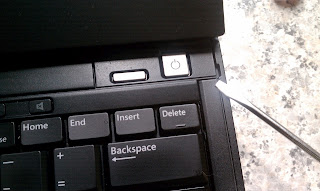
| I prefer to use a nylon or plastic spudger but as I couldn't find mine and this is my personal machine I opted for the flat tip screwdriver. The plastic parts can snap very easily so take your time and lift just a tiny bit at a time. In this photo, just above the tip of the blade you can see a small slot in the plastic. That is where you will first carefully start to pry up. |
Work slowly from right to left. Slide the tip of your spudger or finger along the bezel and it will un-clip from the base. Again, work slowly and do not stress this thin plastic at too great an angle, it will snap. On this particular laptop there are no connections between this bezel and the base, such as cabling of any type.
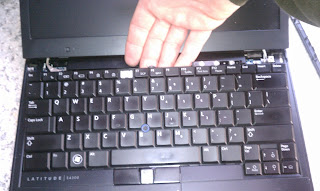
There are only three screws that hold the board in place. One above the Esc, one above the F8 and one above the Insert keys. Remove these screws and set them aside.
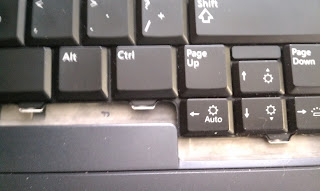
On both the left and right side of the board are these small bumps or keys. They snap in and out of place under the base.
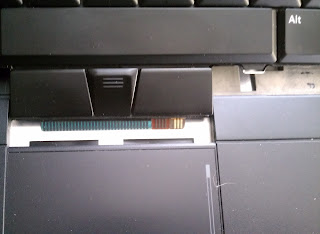
As you pull up and towards the screen you will see that just below the space bar is where the keyboard plugs into the system board just below the track pad.
Now that you have the keyboard removed this is a good time to get a can of compressed air and clean out the base and the CPU fan.
At the base of the keyboard are several keys, such as the one you see here under Ctrl key. When replacing the keyboard you insert the contacts into the slot under track pad first, then these keys will fit under the palm rest. Then just simply lay the keyboard down pushing on the left and right sides to get those small keys on the sides under the base. At the same time keep pressure on edge of keyboard closest to screen to make sure the contacts are seating properly in the slot. See that the screw holes of keyboard and base are lined up and replace your screws.
Thanks for reading,
Tony


